
To clean the Keurig Milk Frother, you will need a few basic items. First, fill the frother with hot water and add some dish soap to it. Swish around the soap and water mixture using a soft sponge or cloth.
Once this is done, empty out the soapy solution and rinse thoroughly with cold water. Then let it air dry before storing away your frother in its original box or container. Occasionally use descaling solution when necessary to remove any mineral deposits that may have built up over time inside of your frother’s chamber walls.
To further ensure proper hygiene, replace your milk frothing wand every 6-8 months since they can accumulate bacteria growth if not regularly cleaned after each use. Following these steps should allow you to keep your Keurig Milk Frother running optimally for many years to come!
- Empty the frother of any existing milk: Unplug the frother and pour out all of the remaining contents
- Then, rinse it with warm water to remove any clinging droplets of milk or residue
- Wipe down the outside of the frother: Use a soft cloth dampened with warm soapy water to wipe down both sides and bottom surfaces of your frother—including the handle and lid if applicable—to remove any visible stains or spills from its exterior shell
- 3
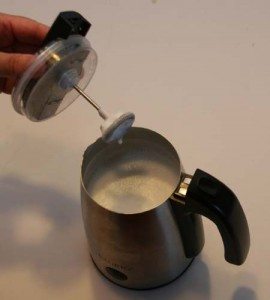
- Clean interior components: Remove all parts that can be detached from your Keurig milk frother (i
- , whisking disk, stirring wand) and wash them in hot soapy water using a non-abrasive sponge or brush before rinsing thoroughly with clean water and drying completely
- Note that plastic parts should not go in dishwasher as this may warp them over time! 4 Sanitize other interior components: Fill up your kitchen sink halfway with hot tap water mixed with 1 teaspoon dishwashing liquid, then submerge all removable components (minus plastic pieces) into solution for 10 minutes to ensure they are sanitized properly before reassembling everything back together again once done soaking/drying off excess moisture afterwards too! 5 Clean reservoir tank area where you put milk: For this step, use a cotton swab dipped in white vinegar to gently scrub away any stubborn bits stuck on inside walls before wiping dry with paper towel – careful not to get too much moisture inside unit though!
Credit: the-gadgeteer.com
How Do You Deep Clean a Keurig Milk Frother?
Deep cleaning a Keurig milk frother is an important part of its regular maintenance. First, fill the carafe with warm water and vinegar (1:1 ratio) and let it sit for 30 minutes. After that, empty out the mixture and rinse the carafe thoroughly with hot water.
Next, pour some clean water into the frother chamber and turn it on until you hear bubbling sounds – this will help remove any residue that’s built up over time. Finally, wipe down all external surfaces of your milk frother with a damp cloth to ensure no dirt or dust remains. Doing this deep clean at least once every couple months should keep your Keurig milk frother in tip-top shape!
Why is My Milk Frother Not Frothing Keurig?
If your Keurig milk frother is not producing foam, the most probable cause could be that you are using a non-dairy or low-fat alternative. Many of these types do not froth as well as full-fat varieties, so try switching to a higher fat option and see if this helps. Additionally, make sure you are heating the milk in short bursts rather than one long heat cycle – this will help create better bubbles for more foam.
Finally, check to make sure your frother wand is clean and free from any residue which may be blocking it – cleaning it regularly should prevent blockages like this in future.
How Do I Descale My Keurig Latte Maker?
Descaling your Keurig latte maker is an important part of maintaining your machine and ensuring that it will continue to work correctly. To descale, you’ll need some white vinegar and a few cups of water. Start by filling the reservoir with equal parts white vinegar and water until it’s about ¾ full.
Place a large cup on the drip tray beneath the nozzle then press the brew button for a few seconds to allow any debris in the system to be released into the cup. Next, run two cleaning cycles using fresh water only; this will help rinse out any remaining residue from both inside and outside of the machine. Finally, let your Keurig sit idle for at least 30 minutes before rinsing one last time with plain water to ensure all traces of vinegar are gone; this step is especially important if you use flavored coffees or lattes as they may absorb some residual taste from the descaling solution.
How Do I Descale My Keurig Latte And Cappuccino Maker?
Descaling your Keurig latte and cappuccino maker is an important part of regular maintenance. To do this, start by filling the water reservoir with a mixture of half white vinegar and half cold water. Place a mug on the drip tray and press the “Brew” button.
After the machine has brewed for about 10 seconds, stop it and empty out the mug. Repeat this process until all of the vinegar-water mixture has been used up from the reservoir – typically around four times. Once finished, fill up the reservoir again with fresh cold water and repeat this same brewing process until you have run at least two full reservoirs through your machine – this will flush out any remaining traces of vinegar from inside your brewer.
Finally, wipe down all external surfaces to ensure that no residue remains before enjoying delicious espresso or lattes!
Clean Milk frother with explanation
Conclusion
After following these steps, you should have a clean Keurig Milk Frother that is ready to use. With the help of this guide, you can quickly and easily keep your frother in top shape and make sure it always produces delicious lattes and cappuccinos. Keeping your frother clean will ensure its longevity and help you enjoy fresh drinks for many years to come!

Alessandra Sarria is not only the creator but also a writer and editor of Best Cooking Things. He does most of the cooking at home. His friends and family members look forward to eating the delicious creations. He loves to cook. So he often writes about the problems or questions that arise while cooking at home. So that others do not get into trouble. One of the best ideas about which cooking tools are best can be found in his writings. From his own experience, he highlighted how different cookwares are.