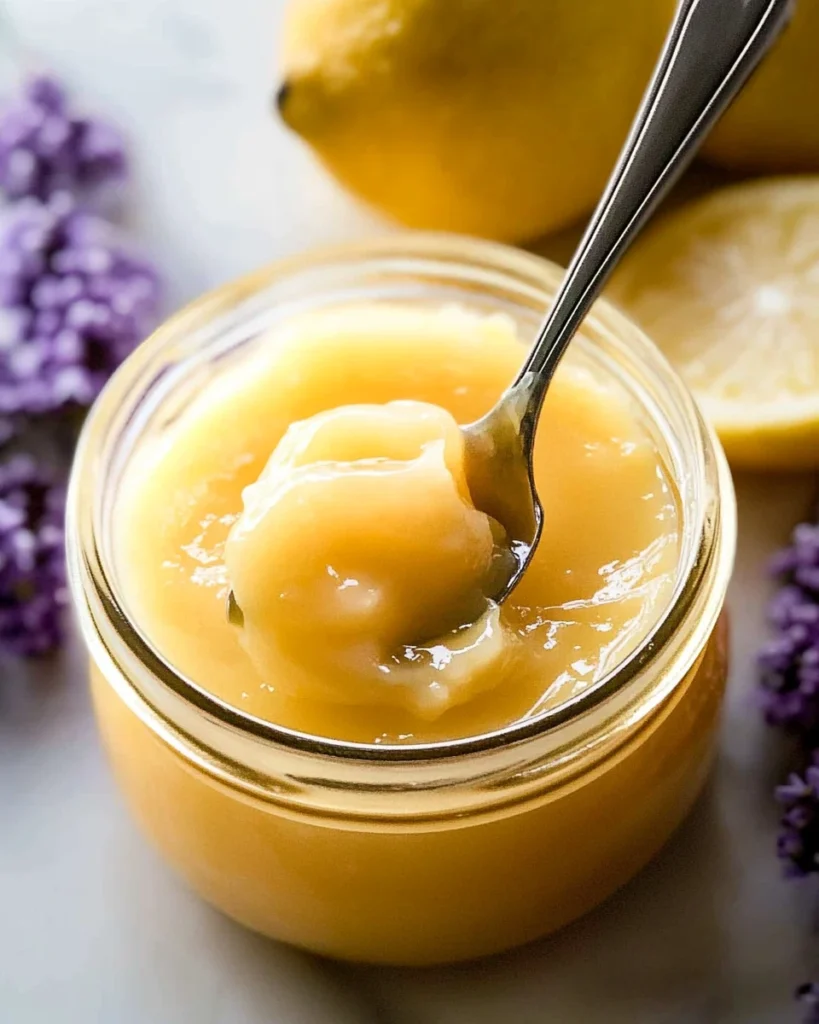
Lemon curd is one of those magical creations in the kitchen that brings a burst of sunshine to any dish. It’s tangy, sweet, and oh-so-delicious. You can spread it on toast, swirl it into yogurt, or use it as a filling for pastries. The best part? Making lemon curd is easier than you might think. With just a few simple ingredients, you’ll be on your way to whipping up a luscious treat that your friends and family will absolutely adore.
Jump to:
- Why You’ll Love This Lemon Curd
- What is a Lemon Curd
- Ingredients for Lemon Curd
- How to Make Lemon Curd
- Preparing the Ingredients
- Zesting and Juicing the Lemons
- Mixing Egg Yolks and Sugar
- Incorporating Lemon Juice
- Cooking the Mixture
- Adding Butter for Creaminess
- Strain for Smoothness (Optional)
- Storing the Lemon Curd
- Serving Suggestions
- Tips for Success
- Variations
- Pairing Ideas
- FAQs
- More Easy Appetizers & snacks Recipes:
- 📖 Recipe Card
But wait—why should you even bother making lemon curd at home? For starters, nothing compares to the fresh, vibrant flavor of homemade lemon curd. Store-bought versions just can’t capture that rich citrus taste that makes your taste buds dance. Plus, you get to control the sweetness and the overall texture. So, are you ready to brighten your day with this homemade delight? Let’s jump right in!
Why You’ll Love This Lemon Curd
One of the best things about lemon curd is its incredible burst of citrus flavor. Every spoonful brings a refreshing, vibrant taste that can elevate any dessert. You’ll find that it strikes the perfect balance between sweetness and tanginess, making it versatile enough to use in a variety of recipes. Whether you spread it on your morning toast, drizzle it atop pancakes, or fill a delicate pastry, lemon curd can transform ordinary dishes into extraordinary experiences.
What is a Lemon Curd
Lemon curd is a sweet and tangy spread or filling that is perfect for desserts. Traditionally made with lemon juice, sugar, and eggs, it’s cooked gently until thickened to create a luscious texture. Its origins date back to the 19th century in England, where it became a popular filling for tarts and cakes. Over time, lemon curd has become a beloved staple in dessert-making, celebrated in various cultures for its delightful balance of flavors.

Ingredients for Lemon Curd
To make your lemon curd, gather the following ingredients:
- 1 cup granulated sugar (200g)
- 2 tbsp lemon zest (zest of two lemons)
- 6 egg yolks
- 1/2 cup lemon juice (minus one tablespoon, 100mL)
- 1/2 cup unsalted cold butter
These simple ingredients come together to create something truly special.
How to Make Lemon Curd
Now, let’s get to the fun part—making lemon curd!
Preparing the Ingredients
First, separate the egg yolks from the whites. You can save the egg whites for another recipe, perhaps for a frothy meringue or an egg white omelet.
Zesting and Juicing the Lemons
Next, zest the lemons. The zest is where a lot of the flavor is concentrated, so take your time. If you want to enhance the flavor even more, consider blending the zest with the sugar in a food processor. This not only incorporates the zest but also allows the citrus oils to mingle with the sugar.
Mixing Egg Yolks and Sugar
Now, strain the egg yolks into a pot and whisk them lightly. Add the granulated sugar in and mix until the color lightens. This step is crucial as it helps create that smooth texture you’re looking for in your lemon curd.
Incorporating Lemon Juice
Gradually stir in your freshly squeezed lemon juice. Mixing well ensures the lemon juice blends nicely with the egg yolk mixture, creating a delightful harmony of flavors.
Cooking the Mixture
Now it’s time to heat things up. Place your pot over low heat, stirring constantly with a wire whisk. You’ll want to keep an eye on it until the mixture thickens and starts bubbling. This can take some time, so don’t rush it. Enjoy the delicious aroma filling your kitchen!
Adding Butter for Creaminess
Once thickened, remove the pot from heat and add your cold, cubed butter. Stir until fully melted and incorporated; this is what gives the lemon curd its rich and creamy texture.
Strain for Smoothness (Optional)
If you desire an ultra-smooth finish, this is the moment to strain the curd through a fine sieve. This optional step removes any zest bits and ensures your lemon curd is silky and decadent.
Storing the Lemon Curd
Transfer your lemon curd into a sealable container. Make sure to cover the surface with plastic wrap, which helps to avoid a skin from forming as it cools down.
Serving Suggestions
Once your lemon curd is ready, it’s time to enjoy it! Here are some wonderful ways to serve it:
- Spread it on toast or scones for breakfast. The tangy sweetness pairs beautifully with warm bread.
- Use it as a filling in cakes, cupcakes, or pastries. Its vibrant flavor enhances any dessert.
- Swirl it into yogurt for a refreshing treat. It adds a delightful zing to morning parfaits.
Tips for Success
To ensure your lemon curd turns out perfectly, keep these tips in mind:
- Use fresh lemons for the best flavor. The zest and juiciness make all the difference.
- Stir constantly while cooking to prevent curdling. Keeping the heat low is key to a smooth consistency.
- Always strain for a silky texture, if you want that perfect finish.
Variations
If you’re feeling adventurous, consider these fun variations:
- Try adding fresh herbs like thyme for an aromatic twist. It pairs surprisingly well with the tang of lemon.
- Incorporate other citrus fruits, such as orange or lime, for a mixed zest flavor. This adds another layer of complexity to your curd.
Pairing Ideas
Lemon curd isn’t just delicious on its own; it pairs wonderfully with others:
- Enjoy it with shortbread cookies or meringues for a delightful dessert table.
- Pair it beautifully with ginger for an extra zing. The warmth of ginger complements the citrus perfectly.
FAQs
1. Can I make lemon curd without butter?
Yes, you can substitute butter with coconut oil for a dairy-free version that still maintains creaminess.
2. How long does homemade lemon curd last?
When stored properly in the fridge, it typically lasts about 1-2 weeks.
3. Can I freeze lemon curd?
Absolutely! Lemon curd can be frozen for up to 3 months. Just ensure it’s in an airtight container.
4. What can I use lemon curd for besides spreading?
It’s fantastic as a filling for tarts, cakes, and can even be used in pancakes or cheesecakes.
5. Is lemon curd safe to eat?
Definitely! Homemade lemon curd is safe as long as it’s cooked properly and stored correctly.
Lemon curd is truly a delightful treat that marries a zesty punch with a creamy texture. It’s an excellent addition to your dessert repertoire, enhancing breakfasts and sweets alike. Now that you’ve learned how to make it, I hope you enjoy exploring its many uses and sharing this sunny delight with friends and family. Happy cooking!
More Easy Appetizers & snacks Recipes:
Did You Enjoy Making This Recipe? Please rate this recipe with ⭐⭐⭐⭐⭐ or leave a comment.
📖 Recipe Card
Print
Lemon Curd
Lemon curd is a sweet and tangy treat that adds a burst of citrus to any dish. It’s easy to make and can elevate your breakfasts and desserts.
- Total Time: 25 minutes
- Yield: 2 cups 1x
Ingredients
- 1 cup granulated sugar (200g)
- 2 tbsp lemon zest (zest of two lemons)
- 6 egg yolks
- 1/2 cup lemon juice (minus one tablespoon, 100mL)
- 1/2 cup unsalted cold butter
Instructions
- Separate egg yolks from whites.
- Zest the lemons, optionally blending with sugar for enhanced flavor.
- Whisk egg yolks and granulated sugar until color lightens.
- Gradually stir in lemon juice.
- Heat mixture over low heat, stirring constantly until thickened.
- Remove from heat and incorporate cold butter until melted.
- Strain for smoothness if desired.
- Store in a sealable container, covering surface with plastic wrap.
Notes
Using fresh lemons greatly enhances flavor.
Keep stirring to prevent curdling.
Straining can provide a silky texture.
- Prep Time: 10 minutes
- Cook Time: 15 minutes
- Category: Dessert
- Method: Stovetop
- Cuisine: British
Nutrition
- Calories: 115
- Sugar: 13
- Sodium: 20
- Fat: 6
- Saturated Fat: 4
- Unsaturated Fat: 2
- Trans Fat: 0
- Carbohydrates: 14
- Fiber: 0
- Protein: 1
- Cholesterol: 130