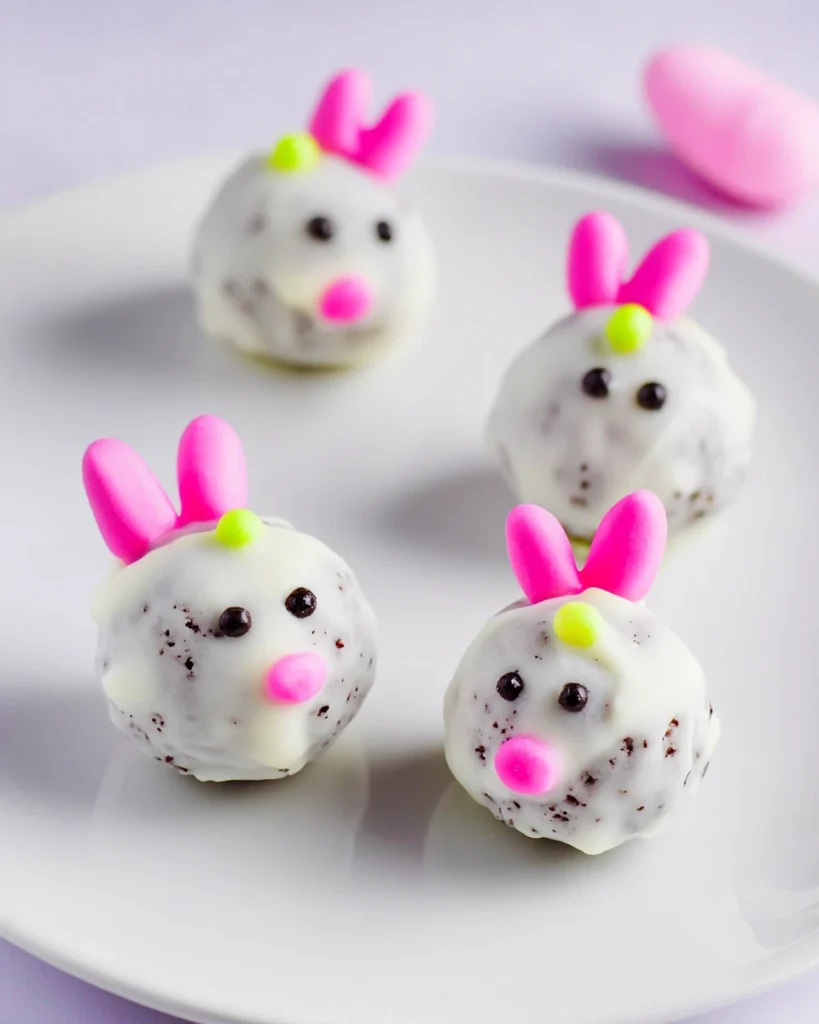
Easter Bunny Oreo Balls are the perfect treat to celebrate the joy of spring! Imagine a creamy, delicious blend of crushed Oreos and cream cheese shaped into adorable little bunny balls. Coated in sweet white chocolate and decorated with fun toppings, they almost look too cute to eat! These treats are delightful for family gatherings, kids’ parties, or even just to satisfy your sweet tooth. What’s great is that they’re simple to make, allowing you to get everyone involved in the kitchen. In this guide, I’ll walk you through the steps to create these whimsical goodies that not only taste fabulous but also bring a sparkle of joy to your Easter celebrations. Let’s hop into the joy of making Easter Bunny Oreo Balls!
Jump to:
- Why You’ll Love This Easter Bunny Oreo Balls
- What is an Easter Bunny Oreo Ball?
- Ingredients for Easter Bunny Oreo Balls
- How to Make Easter Bunny Oreo Balls
- Prepare Your Baking Surface
- Crush the Oreos
- Mix with Cream Cheese
- Form the Oreo Balls
- Chill the Oreo Balls
- Melt the White Chocolate
- Dip the Oreo Balls
- Create Bunny Ears
- Decorate the Bunny Balls
- Chill to Set
- Serving Suggestions
- Tips for Success
- Variations
- Storage Tips
- FAQs
- More Easy Desserts Recipes:
- 📖 Recipe Card
Why You’ll Love This Easter Bunny Oreo Balls
Easter Bunny Oreo Balls are a delightful and whimsical treat that captures the essence of springtime celebrations. With their adorable design and rich flavors, these treats are perfect for holiday gatherings, kids’ parties, or simply indulging your sweet tooth. The combination of creamy cream cheese and crunchy Oreos, all coated in sweet white chocolate, creates an irresistible flavor that’ll have everyone coming back for more!
What is an Easter Bunny Oreo Ball?
An Easter Bunny Oreo Ball is a fun and festive dessert that features crushed Oreos blended with cream cheese, shaped into bunny-like balls, and then dipped in white chocolate. Decorated with mini marshmallows, candy eyes, and colorful sprinkles, these sweet treats are sure to brighten up any Easter celebration. They’re easy to make and are a great way to get kids involved in holiday baking!
Ingredients for Easter Bunny Oreo Balls
- 1 package (14.3 ounces) Oreo cookies
- 8 ounces cream cheese, softened
- 16 ounces white candy melts
- 36 mini marshmallows
- Pink sugar sprinkles
- 36 pink chocolate balls
- 36 white chocolate balls
- 72 small candy eyes
How to Make Easter Bunny Oreo Balls
Prepare Your Baking Surface
First, line a baking sheet with wax or parchment paper to prevent sticking; this little step can make clean-up much easier later.
Crush the Oreos
Place the Oreo cookies into a food processor and pulse until you achieve a crumb-like texture. It’s crucial to ensure no large pieces remain, so keep pulsing until it’s nice and fine.
Mix with Cream Cheese
Now, cut the cream cheese into chunks and add it to the Oreo crumbs. Pulse this mixture until well blended, creating a smooth and uniform dough. This consistency is vital for forming the balls, so make sure it’s mixed thoroughly.
Form the Oreo Balls
Using a small cookie scoop, portion out the mixture and roll each into a smooth, round ball, about 1 inch in diameter. Arrange these on your prepared baking sheet. This part is fun, so include the kids!
Chill the Oreo Balls
For best results, place your tray in the freezer for about 30 minutes. This helps to firm up the balls before the decorating fun begins.
Melt the White Chocolate
In a large bowl, microwave the white candy melts for 30 seconds. Stir well and then continue microwaving in 15-second intervals until the chocolate is completely melted and smooth. This step is crucial, so take your time to get the perfect melted chocolate.
Dip the Oreo Balls
Carefully drop the chilled Oreo balls into the melted white chocolate, coating them fully. Use a fork to lift them out, gently tapping against the bowl’s edge to remove any excess chocolate. Then, place the coated balls back on the baking sheet.
Create Bunny Ears
For the bunny ears, cut the mini marshmallows in half diagonally. Press the cut side into the pink sugar sprinkles, creating a sugary finish that’s too cute to resist!
Decorate the Bunny Balls
Once the chocolate has set slightly, use the leftover melted chocolate and a toothpick to attach the bunny ears, pink chocolate balls for noses, white chocolate balls for cheeks, and small candy eyes to each Oreo ball. This is where it gets really fun, so let your creativity flow!
Chill to Set
Finally, place the decorated tray back in the refrigerator and chill for about 1 hour or until everything is firm. This final chill solidifies the decorations so they don’t fall off.
Serving Suggestions
Serve Easter Bunny Oreo Balls as a centerpiece on your dessert table. Alternatively, you can package them individually in clear bags tied with pastel ribbons, making delightful Easter gifts. They also make excellent additions to Easter brunch or family gatherings, sure to bring smiles and sweetness to all.
Tips for Success
- Ensure the cream cheese is softened for easier mixing.
- Don’t skip the chilling step; it helps the balls maintain their shape when dipped in chocolate.
- Use a toothpick to create fun designs with the melted chocolate.
Variations
Get creative! Try using different flavored cookies like mint or peanut butter for unique Oreo Balls. Additionally, you can also use colored candy melts to match your party theme. Mixing it up keeps things interesting!
Storage Tips
Store leftover Easter Bunny Oreo Balls in an airtight container in the refrigerator for up to a week. For longer storage, freeze them, separating layers with parchment paper to keep them delicious.
FAQs
Can I use different types of cookies?
Yes! Feel free to experiment with flavored cookies like chocolate mint or peanut butter for a delicious twist.
How do I make them gluten-free?
Use gluten-free Oreo cookies for this recipe to ensure your treats are gluten-free.
Can I make these ahead of time?
Absolutely! They can be made up to a week in advance and stored in the fridge until you’re ready to serve.
What can I substitute for white chocolate?
You can use dark chocolate or milk chocolate melts for a different flavor profile; switch it up for something new!
Can kids help make these?
Yes! Kids love rolling the balls and decorating them, making it a fun family activity that creates lasting memories.
These Easter Bunny Oreo Balls are more than just a dessert; they are a fun way to celebrate the holiday with loved ones. Easy to make and full of flavor, these delightful treats will bring joy and sweetness to your Easter festivities. Whether you’re hosting a gathering, preparing an egg hunt, or simply treating yourself, these charming bunny balls are sure to make your Easter memorable. Grab the ingredients and get ready to create a festive masterpiece that everyone will adore!
More Easy Desserts Recipes:
- No-Bake Chocolate Éclair Cake
- Bakery Buttercream Frosting
- White Buttermilk Texas Sheet Cake
- Chocolate Covered Peanut Butter Balls with Rice Krispies
Did You Enjoy Making This Recipe? Please rate this recipe with ⭐⭐⭐⭐⭐ or leave a comment.
📖 Recipe Card
Print
Easter Bunny Oreo Balls
Easter Bunny Oreo Balls are delightful treats that combine creamy cream cheese and crunchy Oreos, all enclosed in sweet white chocolate. Perfect for gatherings and a fun family activity, these adorable bunny balls bring a joyful spirit to your celebrations!
- Total Time: 45 minutes
- Yield: 36 balls 1x
Ingredients
- 1 package (14.3 ounces) Oreo cookies
- 8 ounces cream cheese, softened
- 16 ounces white candy melts
- 36 mini marshmallows
- Pink sugar sprinkles
- 36 pink chocolate balls
- 36 white chocolate balls
- 72 small candy eyes
Instructions
- Line a baking sheet with wax or parchment paper.
- Crush Oreos in a food processor until fine crumbs remain.
- Mix the Oreo crumbs with cream cheese until well blended.
- Form round balls from the mixture and place them on the baking sheet.
- Chill the balls in the freezer for 30 minutes.
- Melt white candy melts in intervals until smooth.
- Dip each ball in melted chocolate, removing excess.
- Create bunny ears using halved mini marshmallows and sprinkle with pink sugar.
- Decorate balls with melted chocolate, candy eyes, and chocolate balls.
- Chill decorated balls for 1 hour until firm.
Notes
Use softened cream cheese for easier mixing.
Chilling is essential to maintain the shape during chocolate coating.
Experiment with different flavored cookies for a twist.
- Prep Time: 30 minutes
- Cook Time: 15 minutes
- Category: Dessert
- Method: No-Bake
- Cuisine: American
Nutrition
- Calories: 150
- Sugar: 10g
- Sodium: 50mg
- Fat: 7g
- Saturated Fat: 4g
- Unsaturated Fat: 2g
- Trans Fat: 0g
- Carbohydrates: 22g
- Fiber: 1g
- Protein: 1g
- Cholesterol: 10mg