Why You’ll Love This Baked Mini Egg Easter Cheesecake
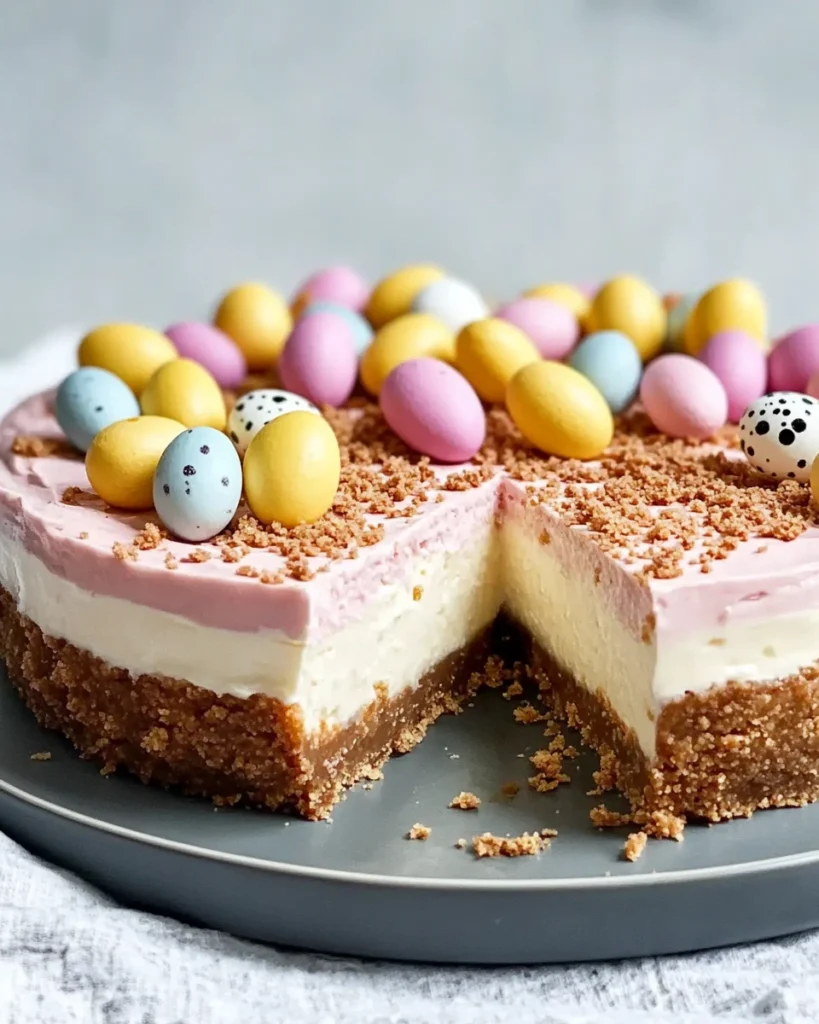
Easter is the perfect time to bring out your baking skills, and what better way to celebrate than with a Baked Mini Egg Easter Cheesecake? This dessert combines the richness of cheesecake with the fun and cheer of mini chocolate eggs, creating a treat that everyone will love. It not only catches the eye with its vibrant pink hue but also tempts your taste buds with its creamy texture and delightful crunch from the candies. Whether you’re hosting a family gathering or simply enjoying a cozy dessert at home, this cheesecake will add a festive touch to your table. Picture it: a slice of creamy cheesecake, topped with colorful mini eggs, ready to make your holiday unforgettable!
Jump to:
- Why You’ll Love This Baked Mini Egg Easter Cheesecake
- What is a Baked Mini Egg Easter Cheesecake
- Ingredients for Baked Mini Egg Easter Cheesecake
- Preparing the Crust
- Combine Crust Ingredients
- Press Crust into Pie Pan
- Bake the Crust
- Making the Cheesecake Filling
- Prepare the Cream Cheese Mixture
- Add Eggs and Flavoring
- Assembling and Baking the Cheesecake
- Fill the Crust with Cheesecake Mixture
- Bake the Cheesecake
- Topping and Cooling
- Add Mini Chocolate Easter Eggs
- Cool and Refrigerate
- Serving Suggestions
- Tips for Success
- Variations
- Storage Tips
- Pairing Ideas
- FAQs
- More Easy Desserts Recipes:
- 📖 Recipe Card
What is a Baked Mini Egg Easter Cheesecake
So, what exactly is a Baked Mini Egg Easter Cheesecake? It’s a lovely dessert that features a smooth, creamy filling made with rich cream cheese and delightful mini chocolate Easter eggs. The dessert often has a beautiful pink color, enhanced by a touch of food coloring. Its base is a buttery graham cracker crust, which adds a satisfying crunch that perfectly complements the creamy filling. This cheesecake is not just a dessert; it’s a wonderful addition to any holiday celebration, bringing joy and sweetness in every bite.
Ingredients for Baked Mini Egg Easter Cheesecake
- 1 1/2 cups graham cracker crumbs
- 1/4 cup powdered sugar
- 4 tablespoons butter, melted
- 2 (8-ounce) packages cream cheese, softened
- 2/3 cup sugar
- 2 eggs, room temperature
- 1 teaspoon vanilla extract
- Pink food coloring (as desired)
- 2 cups mini chocolate Easter eggs for topping
Preparing the Crust
Combine Crust Ingredients
Begin by grabbing a medium bowl and mixing together the graham cracker crumbs, powdered sugar, and melted butter. You want to combine these until the mixture resembles wet sand and easily clings together when pressed. This helps create the perfect crust for your cheesecake!
Press Crust into Pie Pan
Next, take your crust mixture and transfer it into a 9-inch pie pan. Using your hands or the back of a measuring cup, press it firmly into the bottom and up the sides evenly. Make sure it’s well-packed; this keeps it sturdy when you add the cheesecake filling.
Bake the Crust
Now, it’s time to bake! Place the crust in a preheated oven at 350°F for about 10 minutes. You want to bake it just until it sets but doesn’t get too brown. Once done, take it out and let it cool while you prepare the filling.
Making the Cheesecake Filling
Prepare the Cream Cheese Mixture
In a large mixing bowl, beat the softened cream cheese and sugar together. You want to mix until the texture is smooth and creamy, which should take about 2-3 minutes. It’s crucial that there are no lumps so your cheesecake has that silky texture.
Add Eggs and Flavoring
Now, add the eggs one at a time, mixing well after each addition. Follow this with the vanilla extract and a few drops of pink food coloring. Mix until everything is fully combined, and you have a lovely pastel pink color. This will give your cheesecake its signature look!
Assembling and Baking the Cheesecake
Fill the Crust with Cheesecake Mixture
Take the bowl of your creamy filling and spread it evenly into the baked graham cracker crust. Smooth it out with a spatula, ensuring that the filling is level.
Bake the Cheesecake
Pop the cheesecake back into the oven and bake for about 30 minutes. You’ll know it’s done when the edges are set but the center still has a slight jiggle. This ensures it remains creamy and delicious.
Topping and Cooling
Add Mini Chocolate Easter Eggs
When your cheesecake is out of the oven, sprinkle those adorable mini chocolate Easter eggs on top while it’s still warm. This will help them stick into the filling.
Cool and Refrigerate
Let your cheesecake cool down to room temperature before placing it in the refrigerator. It’s best to chill it for at least 4 hours, but overnight is ideal. This lets all the flavors meld beautifully.
Serving Suggestions
When you’re ready to serve, take the cheesecake out of the fridge. Serve it chilled, maybe even garnished with some extra mini eggs or a handful of fresh berries for that added pop of color. If you’re feeling indulgent, a dollop of whipped cream or a drizzle of chocolate sauce can take it to the next level.
Tips for Success
To ensure you have the best Baked Mini Egg Easter Cheesecake, make sure your cream cheese is softened to room temperature. This makes it blend easier and results in a smoother filling. Also, feel free to get creative with food coloring. Different shades can give your cheesecake a cheerful vibe that suits your celebration!
Variations
Want to switch things up? You can try swapping out the mini chocolate eggs for some seasonal fruits, like strawberries or raspberries. These add a fresh and fruity twist to your dessert. Another fun idea is to incorporate a hint of lemon zest into the mixture for a bright citrus flavor that complements the sweetness.
Storage Tips
After enjoying your cheesecake, any leftovers can be stored in an airtight container in the refrigerator for up to 5 days. If you have more than you can finish, you can freeze slices wrapped tightly. They’ll keep well for up to 3 months. Just remember to thaw them overnight in the fridge before serving.
Pairing Ideas
To enhance your dessert experience, why not enjoy your cheesecake with a cup of coffee or tea? The warmth and depth of these beverages perfectly complement the sweet cheesecake. For a lighter option, pairing it with a fruit salad can create a nicely balanced dessert spread.
FAQs
1. Can I make this cheesecake ahead of time?
Absolutely! Making it a day ahead allows the flavors to meld beautifully.
2. What can I substitute for cream cheese?
Mascarpone or ricotta can be used, but they will change the flavor and texture a bit.
3. Can I use a different crust?
Definitely! An Oreo crust or any favorite cookie crust can work well with a few adjustments to the ingredients.
4. Is there a gluten-free option?
Yes, gluten-free graham crackers or a nut-based crust can be a suitable alternative.
5. How do I know when the cheesecake is done?
Look for a set edge and a slight jiggle in the center to ensure it’s perfectly baked.
This Baked Mini Egg Easter Cheesecake is not only a feast for the senses but also a perfect way to create lasting memories during Easter celebrations. With its creamy texture and playful toppings, it makes every gathering a little sweeter and more festive. Indulge in this delightful dessert, and share it with loved ones to make your holiday extra special!
More Easy Desserts Recipes:
- No-Bake Chocolate Éclair Cake
- Bakery Buttercream Frosting
- White Buttermilk Texas Sheet Cake
- Chocolate Covered Peanut Butter Balls with Rice Krispies
Did You Enjoy Making This Recipe? Please rate this recipe with ⭐⭐⭐⭐⭐ or leave a comment.
📖 Recipe Card
Print
Baked Mini Egg Easter Cheesecake
This cheesecake blends a creamy filling with the joy of mini chocolate eggs, perfect for Easter gatherings. Its vibrant color and rich flavor make it a standout dessert!
- Total Time: 55 minutes
- Yield: 8 servings 1x
Ingredients
- 1 1/2 cups graham cracker crumbs
- 1/4 cup powdered sugar
- 4 tablespoons butter, melted
- 2 (8-ounce) packages cream cheese, softened
- 2/3 cup sugar
- 2 eggs, room temperature
- 1 teaspoon vanilla extract
- Pink food coloring (as desired)
- 2 cups mini chocolate Easter eggs for topping
Instructions
- Mix graham cracker crumbs, powdered sugar, and melted butter in a bowl until it resembles wet sand.
- Press the crust mixture into a 9-inch pie pan and ensure it's well-packed.
- Bake the crust at 350°F for about 10 minutes and let it cool.
- In a mixing bowl, beat softened cream cheese and sugar until smooth.
- Add eggs one at a time, mixing well, then add vanilla extract and food coloring.
- Spread filling evenly into the baked crust and bake for 30 minutes.
- Sprinkle mini chocolate Easter eggs on top while warm and cool to room temperature before refrigerating.
- Chill for at least 4 hours before serving.
Notes
Ensure cream cheese is softened to blend smoothly.
Feel free to experiment with food coloring for a festive look.
Leftovers can be stored in an airtight container for up to 5 days.
- Prep Time: 15 minutes
- Cook Time: 40 minutes
- Category: Dessert
- Method: Baking
- Cuisine: American
Nutrition
- Calories: 320
- Sugar: 20
- Sodium: 240
- Fat: 18
- Saturated Fat: 10
- Unsaturated Fat: 8
- Trans Fat: 0
- Carbohydrates: 36
- Fiber: 1
- Protein: 5
- Cholesterol: 85